Tuesday, November 15, 2011

It's begining to look a lot like...

CHRISTMAS!!! 
In my craft room that is :) 
I managed to punch out some holiday cards this past week and wanted to share them with you.  I recently bought a cuttlebug was wanting to use it on these cards.  Each one is a bit different and fun it it's own way. 


This first one I used an ivory cardstock for the main card and cut out a navy blue rectangle and ran it thru the cuttlebug too give the swirls on the paper.  I cut out the snowflakes from the tie the knot cart on shiny silver cardstock and added them on the card with pop dots topped off w/clear gems.  The bear was stamped and cut out with the sizzix stencil.  Then I chalked the edges of the scallops with light blue and added 3 layers of ribbon behind it.  The scallop is adhered with pop dots also... I think I have an obsession with pop dots and chalking... you'll start to see the theme :)
 Here's the inside of the bear card

This second card was fun to make, I knew I wanted something a little whimscial, I chalked the edges of white cardstock with a grey chalk to add some distressing to the card.  The stockings are cut out from the country life cart and I added the ever so popular gel pen stitching.  I ran a black ribbon across the card so the stocking had something to hang from and ... you guessed it, adhered the stockings with pop dots!
 Here's the inside of the stocking card

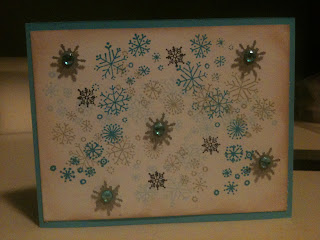
 I was able to use a new technique on this card.  I took 2 stamps in 4 different colors and just stamped them all over a 4x5 1/4 piece of white card stock.  I chalked the outside edges in a tan on this one.  Then I took the same snowflakes I cut out for the bear card and adhered them (with pop dots) in random places and put light blue gems on them for extra color.
This card was fun to create my own patterned paper with just a few simple items and, I think it's one of my favorite cards too.  I could be a bit partial though.
 Inside of the snowflake card

Here's my Tree card.  For those of you that are followers of my blog, you may have seen the thank you cards my mom created about a month back.  I sort of stole part of this card's idea from those.  Well, while we were making the thank you cards, I thought this would be really cute with some red and cream colors tomake it a bit festive.  and whala... here it is :)  Cuttlebug came in handy on this one again, I used it for the trees.  The first tree was glued on with zots and the second... pop dots, so they were staggered and had some dimension.  I chalked the outside edges of the card and the merry christmas greeting in the center.  The red rectangle has faux stitching and I follwed that around the card with black faux stitchingto add a bit of a country feel to the card.
 Inside of the tree card

Hope you enjoyed seeing them as much as I enjoyed making them... come back again!
fell free to leave feedback, I love comments... and pop dots!


Sunday, November 6, 2011

Thank you thank you thank you

My parent's came up from California to visit us for a week and my mom wanted to take some time and make cards, I talk all the time about what I'm making and she's always wanted to play too.  While she was here, she visited some family and friends and decided she wanted to make thank you cards for them.  I have a small collection of carts, and can you believe it, none of them had a pine tree like she wanted to use for her cards.  She had a vision and I could not help her create it.  I started up my design studio and she went to town.  I think she's a natural at this, must be where I get my creative mind from, even though she would deny it.  She used a banner triangle and created a pine tree, I showed her how to hide the contours for the holes and we cut out different sizes of this tree, then she used the cuttle bug to add some design to them.  I taught her about chalking edges, stamping, and my favorite... pop dots.  lol.  Here are her cards, they are by far amazing :)  Way to go Mom!  If we just lived a bit closer, we'd be doing this all the time.  lol.


Back at it... in full Swing

Hi All,
   So sorry for slacking on my posts the past few months, while I have been creating, I've been way behind on posting my projects for you to see.  Here's a Halloween card that I made for a friend of mine... Hope you like it...


Wednesday, October 5, 2011

Simply Lovely

I received an order to create a wedding card which is something I have yet to make.  I was excited to use my greeting farm stamp and of course I wanted to make it elegant.  So, I used a stack of paper I had just bought and was eager to use. 

I used my fantastic clear pen to add sparkle to the white bridal dress while using stardust gelly roller pens charcol to add some sparkle to the groom's outfit.  To add more of a distressed look, I did chalk the edges with studio g chalk ink. The circle of for the stamp was used, the edges of the card were used as well as the edges inside the card and all the edges on the envelope I made to bring it all together.

I was so excited about this card, I almost didn't want to give it away.  I secretly have plans to make a duplicate just for me to keep for my selfishness :) 

Lemme know what your thoughts are!


E2 Contest Submission

Hi all!
I wanted to share with you the banner I made and submitted to Cricut for their Expression 2 launch contest.  The only cart I used for the banner is Country Life.  I am still learning but I was extrememly happy with the way this one came out.  I faux stitched the letters and the outside of the banner with white gel pen.  I used matching paper to make the rosettes on the outside of the banner.  The center of the rosette's have a simple white pearl. I also added white lines with a gel pen inside each of the creases of the rosettes to give it a bit of a distressed look.

Let me know what you think, I'm game for feeback :)


Monday, October 3, 2011

Funky Cards Helping Kids

I took this post from Madison at Funky Cards to share with all of you.  Like most of you, I jump online to check out what others have made, skim quickly over the words and most of the time, just glace at the pictures before moving on to the next, then off to our next project in life. 

Funky Cards is sharing our crafing love with children who truly could use some personalized love.  Check out this link, and if you're one of the few who don't follow her, you should jump on the bandwagon. She has some very creative projects. 

http://funkycards.blogspot.com/2011/10/i-feel-love-october.html

Thursday, August 25, 2011

Shadowbox for a friend

I swear I never keep any of the cool things I make.  I always make things to give away, oh well; at least I have pictures and get to see the expressions on their faces when they see them!!!  This shadow box I put together for a friend of mine who, growing up, was like a second mom to me.  She has a very cute country home she calls the Red Moose, all thru the home she has accents of moose and outdoorsy items.  After my last trip down to CA in the spring I made her a thank you card with a plaid back ground and a moose on the front.  Very simple but she absolutely loved it, she wanted to put it in a shadow box and display it in her office.  I ended up surprising her with a shadow box, put the card in it, and gave it to her.  She hung it on the wall right then and there.  I love it when people get excited about things I make.  I had found this saying I loved so I put it in the box and the card sits on the bottom.  I took this picture before the card was put in it but the space at the bottom is open for the card. 

The top part says “Advice from a Moose”
Think big
Spend time in the woods
Eat plenty of greens
Hold your head up high
Stay on track
Keep your nose clean
It’s ok to be a little wild

Simply Birthday

I had made these 2 birthday cards for some ladies I know.  The teal one, I love love love.  I think I’ll work on creating box sets of these.  They are very simple and quick to make.  I can actually make 6 by using just 4 pieces of paper.  Any color will go with the black and white background which is nice; they would make great Thank you cards too.  What do you think?


Flags a flyin'

At my work, if we have a question about something we’re doing (I have a detailed job), we have to ring a bell, something like you would see at an old fashion diner *ding* and raise up a flag.  Then quality coaches or technical support specialists come and help with our questions.  When it was my turn to come onto the floor and make a flag, I knew what I had at home and a folder that simply said Help on it was not going to work for me J  I made one for me and a co-worker, since then, people have started requesting them.  I just send out a sheet with my cartridge designs and let them pick what they want and what colors.  I do charge for them but not more than what my cost is to make them.  Here’s the first 2 I started with and below were ones requested.


This last one was fun to make, he'd picked 2 cut-outs from the wildlife lite cart he wanted together in a scene.  I had nothing that resembled a log or rocks for the bear to stand on so I cut out a bunch of mushrooms in different sizes, cut off the tops and wrinkled them so they look like rocks.  Kind of a proud moment for myself.  lol

Dad turned 50!

My dad turned 50 this month and I took a trip down to CA to celebrate it with him and 80 of his closest friends.  He wanted just an outdoor BBQ, very casual and relaxing.  It was a great time, my parent’s had done a ton of work to the yard, landscaped and laid sod, planted flowers, etc.  The house looked amazing, something you’d see in country life magazine.  A few people brought out RV’s to stay the night, it turned out to be a great weekend for everyone who came.  My dad seemed to really enjoy having everyone there to celebrate his day.  Knowing he wanted to keep it low-key, I tried to find a fun invitation for him.  I had posted a few months back my “rough draft” of this invitation so I thought I’d catch everyone up to date and show you how it ended up turning out.  It was a fun card to make and really simple considering.


Oh, oh, oh... more room additions

Ok, so I’ve been slowly working on getting my room just how I want it and those of you who are doing the same or have done the same know that the storage to hold your hobby is just as expensive as the supplies you store.  I found these cute little shelves at Bed Bath and Beyond for $10 and added some vinyl to the shelf to dress it up.  The ribbon holder is a clip it up 36” holder with the clip-it-up on the bottom half.  I also bought a clip-it-up bar that my husband mounted directly under the square shelves that I have all my clear packaged stamps hanging from.  I love the way it turned out looks wise and it’s so much easier to view what I have to work with instead of rummaging thru my boxes of goodies.  I might even have to get another just for my embellishments – they’re slowly growing out of the box.  Lol.


Thank You...Teacher!

If you follow my blog, you know I’ve got a cousin who is a dear friend of mine K Ricketts; she’s been my inspiration for getting into creating as much as I have.  Her passion outside of the craft room is teaching children.  I admire her for her commitment to children and her encouragement to them succeeding.  She’s so dedicated, she even won teacher of the year award for her school last year.  I don’t yet have children but I sure wish that my kids have a teacher like her!
This card is simple but it gets the point across… Thanks K – for all you do!