CHRISTMAS!!!
In my craft room that is :)
I managed to punch out some holiday cards this past week and wanted to share them with you. I recently bought a cuttlebug was wanting to use it on these cards. Each one is a bit different and fun it it's own way.
This first one I used an ivory cardstock for the main card and cut out a navy blue rectangle and ran it thru the cuttlebug too give the swirls on the paper. I cut out the snowflakes from the tie the knot cart on shiny silver cardstock and added them on the card with pop dots topped off w/clear gems. The bear was stamped and cut out with the sizzix stencil. Then I chalked the edges of the scallops with light blue and added 3 layers of ribbon behind it. The scallop is adhered with pop dots also... I think I have an obsession with pop dots and chalking... you'll start to see the theme :)
Here's the inside of the bear card
This second card was fun to make, I knew I wanted something a little whimscial, I chalked the edges of white cardstock with a grey chalk to add some distressing to the card. The stockings are cut out from the country life cart and I added the ever so popular gel pen stitching. I ran a black ribbon across the card so the stocking had something to hang from and ... you guessed it, adhered the stockings with pop dots!
Here's the inside of the stocking card
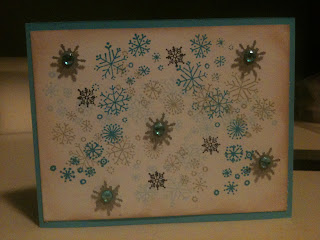
I was able to use a new technique on this card. I took 2 stamps in 4 different colors and just stamped them all over a 4x5 1/4 piece of white card stock. I chalked the outside edges in a tan on this one. Then I took the same snowflakes I cut out for the bear card and adhered them (with pop dots) in random places and put light blue gems on them for extra color.
This card was fun to create my own patterned paper with just a few simple items and, I think it's one of my favorite cards too. I could be a bit partial though.
Inside of the snowflake card
Here's my Tree card. For those of you that are followers of my blog, you may have seen the thank you cards my mom created about a month back. I sort of stole part of this card's idea from those. Well, while we were making the thank you cards, I thought this would be really cute with some red and cream colors tomake it a bit festive. and whala... here it is :) Cuttlebug came in handy on this one again, I used it for the trees. The first tree was glued on with zots and the second... pop dots, so they were staggered and had some dimension. I chalked the outside edges of the card and the merry christmas greeting in the center. The red rectangle has faux stitching and I follwed that around the card with black faux stitchingto add a bit of a country feel to the card.
Inside of the tree card
Hope you enjoyed seeing them as much as I enjoyed making them... come back again!
fell free to leave feedback, I love comments... and pop dots!


